Table Of Contents
- Mobile Apps
- Spryple CRM Mobile Application
Spryple CRM Mobile Application
1. Introduction
1.1 Overview
- Welcome to the Spryple CRM your ultimate companion for real-time tracking and location sharing. Our app empowers you with seamless live tracking capabilities.
1.2 Purpose of the App
- The app serves to Enhance team coordination by monitoring the location of colleagues or employees, facilitating efficient collaboration and logistics.
1.3 System Requirements
- Ensure your device meets the minimum specifications outlined in the system requirements section to guarantee optimal performance.
2. Getting Started
2.1 Installation
-
Open the Play store/App Store and search for ‘Spryple CRM’. Click on ‘Install’ to install it. It is often integrated into the web application
It can be downloaded in both Android & iOS devices
2.1 Account Creation
- Create user accounts for the Manager and the Employee, ensuring secure access to the live tracking system
- The Account Creation is done from the integrated web application. Once the accounts are created, the app is ready to use
2.3 Usage of App
- Open the App and give the necessary credentials based on the role (Manager or Employee) and ensure the device has the internet connection (Mobile data or Wi-Fi)
3. User Interface
3.1 Main Screen
- Navigate through the user-friendly main screen to access key features and functionalities.
3.2 Navigation
- Spryple CRM navigation system allows seamless movement between different features by Selecting and Tapping
4. Employee Level Features:
Employee Login:
- Employees have the features to Punch In/Out, Add Client, Add Activity, Leave Request and Leave History.
4.1 Login:
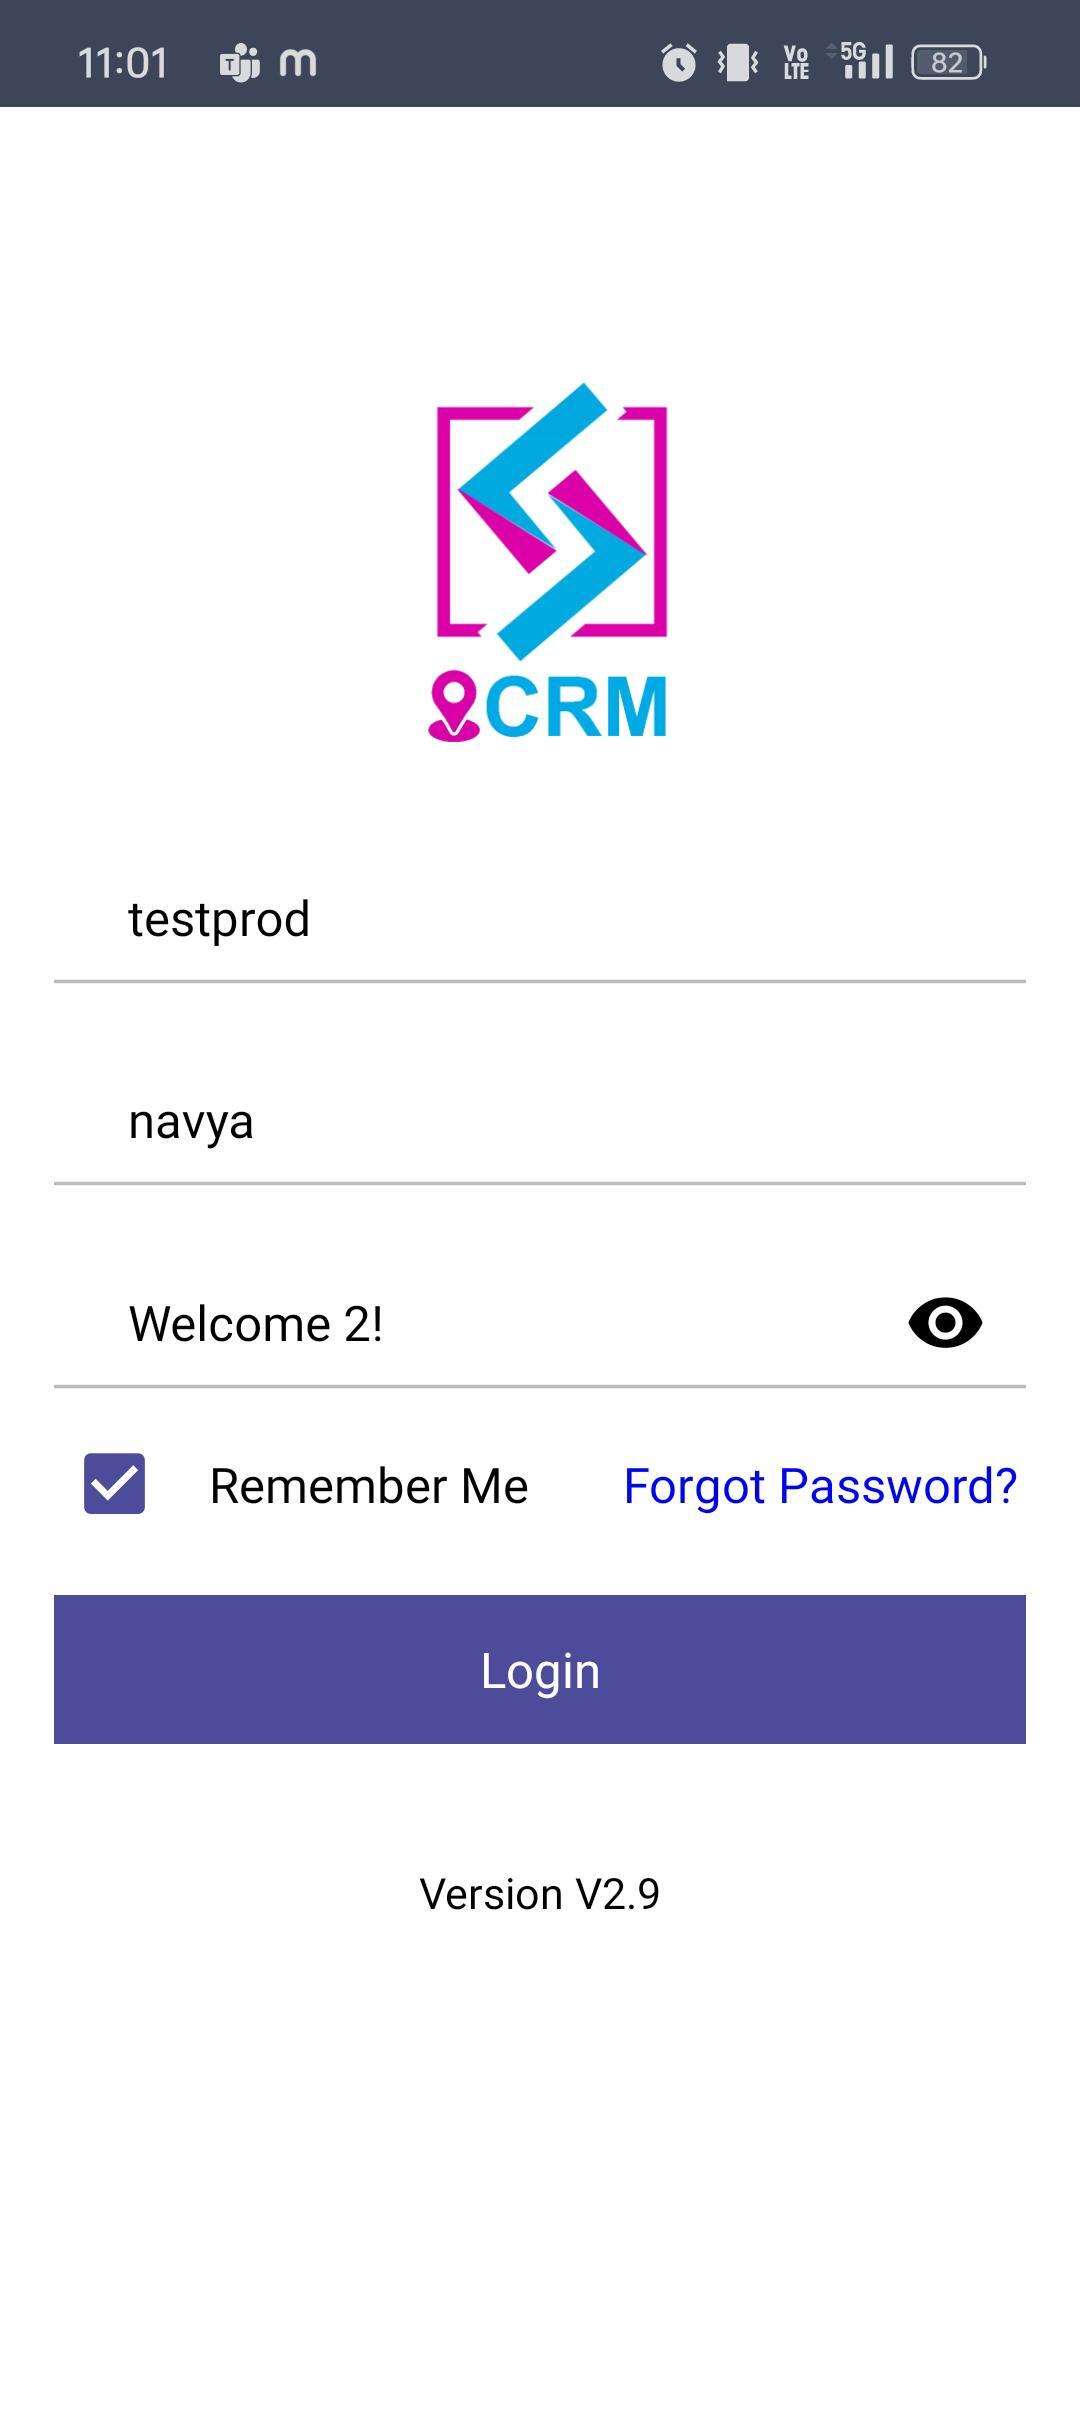
- Enter Company code, Username/Email and Password and click on Login.
4.2 Dashboard:
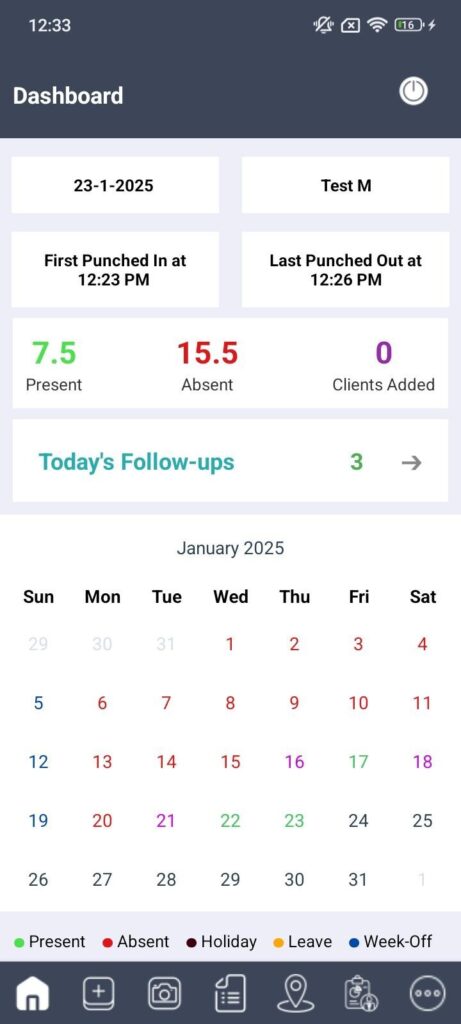
- After successful login, main dashboard is displayed.
- Allow all securities

- Dashboard consist of Present Date, Punch in and punch out time, No. Of Presents, No. Of Absents, No. Of Clients Added, Calendar with Presents, Absents, Holidays, Leaves, Week offs, and Graph.
4.2.1 Today's Followup's:
- On click Today’s Follow-ups arrow “Follow-ups” screen will display
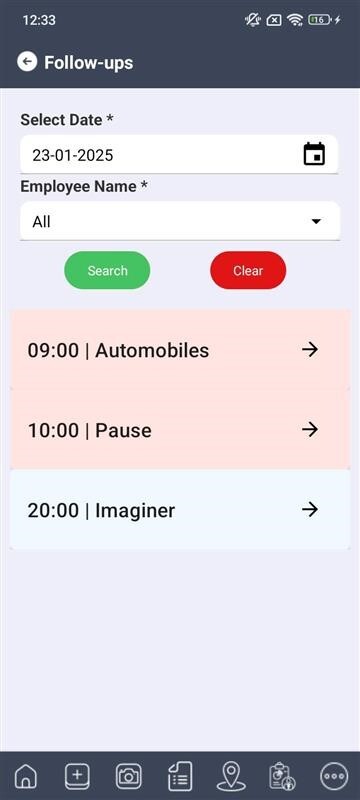
- Select ‘Select Date’ and ‘Employee Name’
- Click on Search button to get today’s follow-ups
- Employees consist of four tabs Dashboard, Add client, Punch In/Out, Activity Dashboard and More
4.2.2 Activities:
- If client want to add activity with only image, Activates option is display in Dashboard in place of Today’s Follow-ups

- On click Activities arrow “Activities” screen will display

- On click “Add Activity” button, Add Activity screen will be displayed

- On click Camera icon, camera will open and on click Take Picture button image will be taken
- Enter Description
- Click on Save button to add activity
- Added activity is display in Activities screen

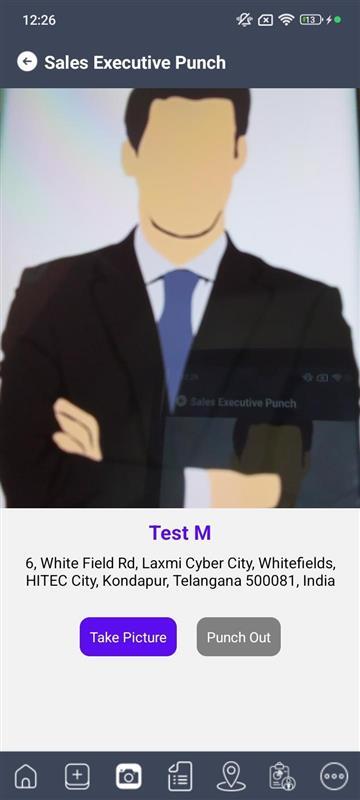
4.3 Punch In/Punch Out:
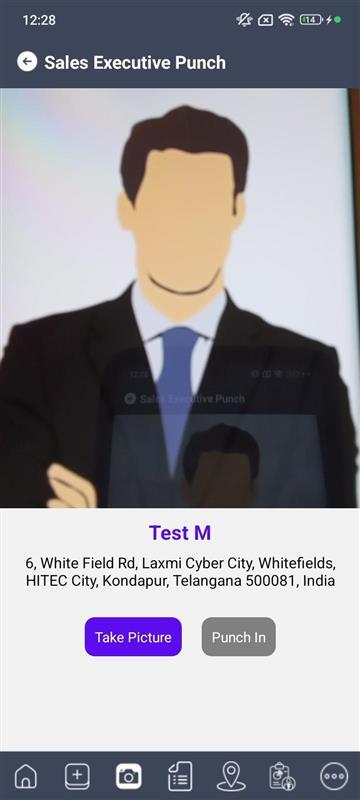
- On click camera tab Punch In screen is display with camera and employee details name and address.
- Click on the Take Picture button Punch In/Out button will enable and employee able to punch in/out.
- Punch In/out image is captured.
4.4 Add Client:
- Sales Executive able to add client
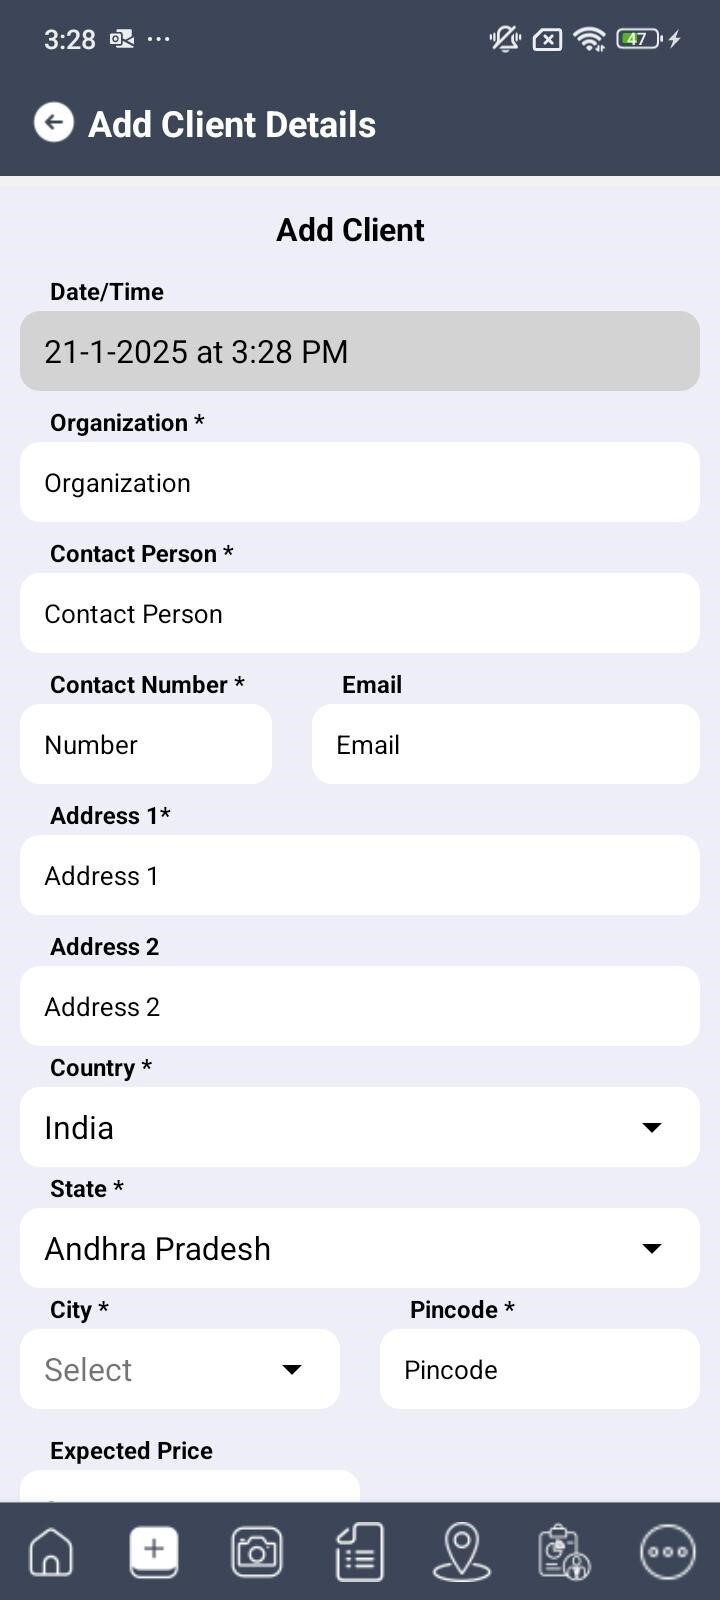
- Click on camera to take picture
- Enter Organization, Contact Person, Contact Number, Email, Address1, Address2.
- Select Country, State, City, Pin code.
- Enter Expected Price and Description.
- Click on Save button to save Client details.
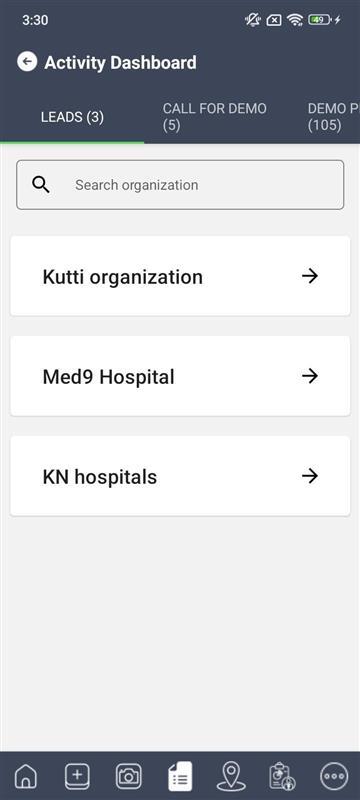
- Added client navigate to Activity dashboard screen LEADS column
4.5 Activity Dashboard:
- Added Clients will be segregated based on the Activity status of the Client. (Leads, Call for Demo, Demo Pending, Demo Completed and Future Leads).
- If the Client was added by the Employee for the very first time, then the Client will be displayed under the Leads.
- Click on the right arrow, add activity screen is displayed.
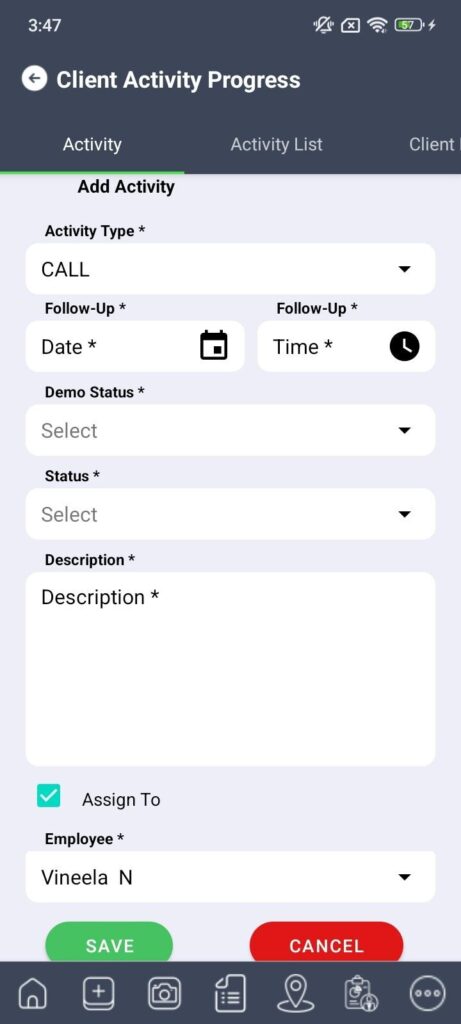
4.5.a Add Activity:
- Select Activity Type, Follow Up time, Follow Up Date, Demo Status, and Status.
- Enter Final Price and Description.
- Click on ‘Save’ button to save activity details.
- Add Client must move to “Call for Demo, Demo Pending, Demo Completed and Future Leads” from the Leads depending on the Demo Status.
4.5.b Activity List:
- Added Activity's details are displayed in Activity List.

4.5.c Client Details:
- Employee able to edit client details

- Click on ‘Edit Details’, fields will be enabled and employees able to edit details.
- Click on ‘Update’ button updated details are saved.
- Click on ‘Cancel’ button edited details are not saved.

4.5.d Client Associates:
- Click on Client Associates tab, Client Associates screen will display with “Add(+)” icon
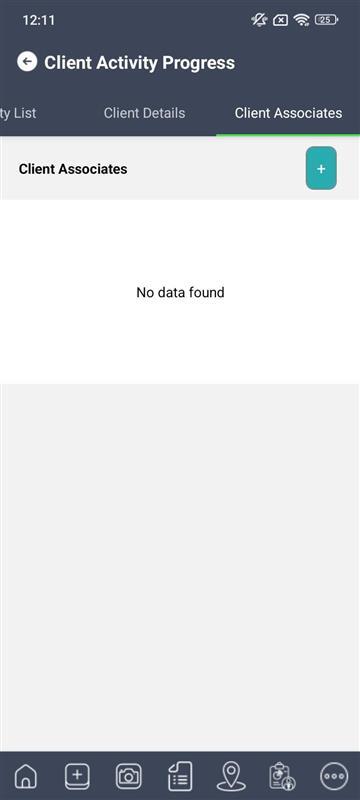
- Click on Add icon fields will display with Save and Cancel buttons
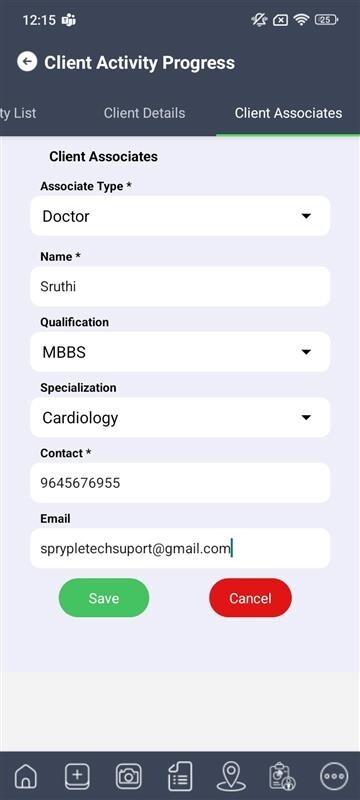
- Select Associate Type, Qualification and Specialization
- Enter Name, Contact Number and Email
- Click on ‘Save’ button to save Client Associates
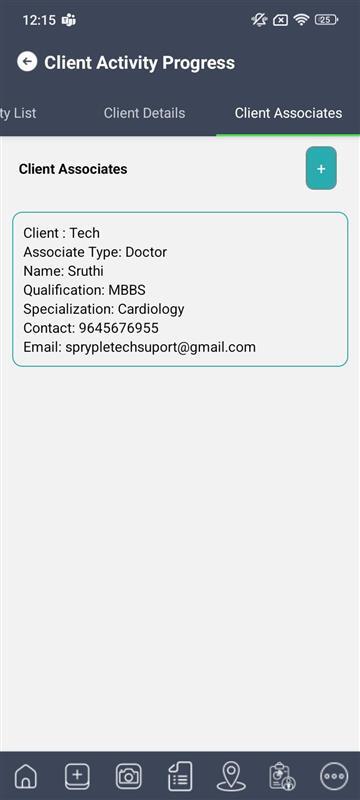
- Added Client Associate will display in front screen
4.5.e Client Payments:
- Click on Client Payments tab, Client Payments screen will display with “Add(+)” icon
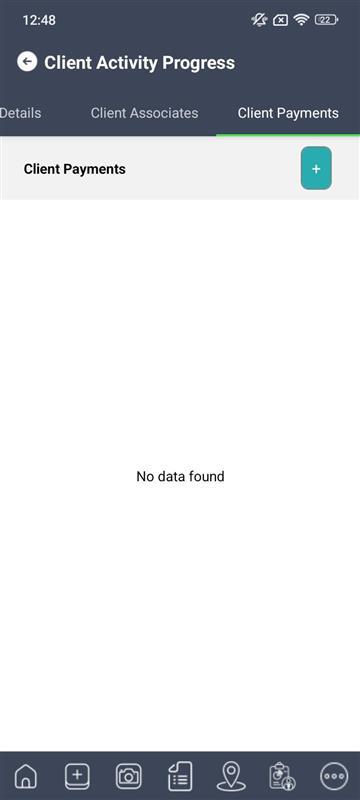
- Click on Add icon fields will display with Save and Cancel buttons
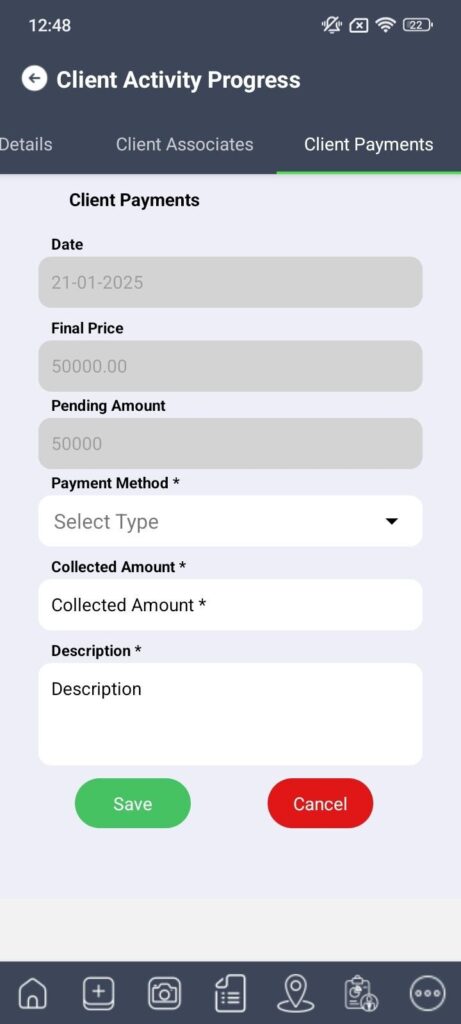
- Select Payment Method
- Enter Collected Amount and Description
- Click on ‘Save’ button to save Client Associates
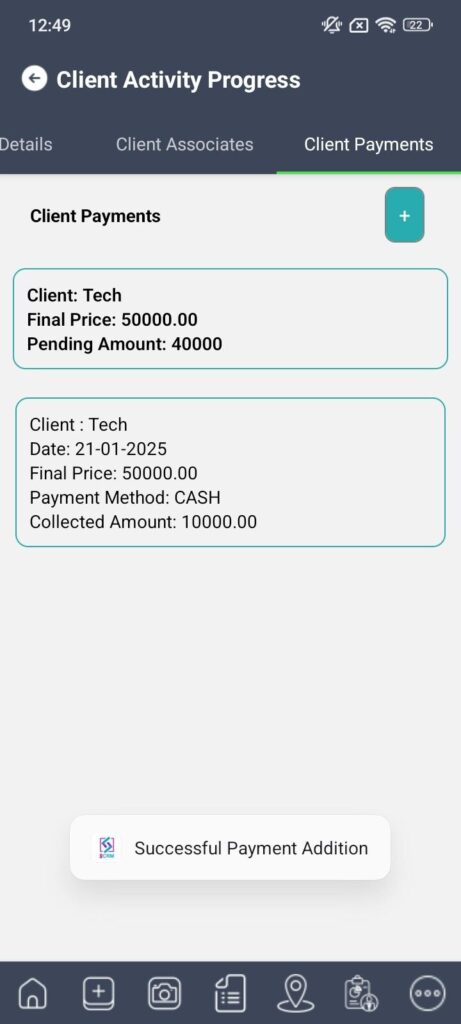
- Added Client Payment will display in front screen
4.6 Travel Approvals:
- Click on Reports tab, Travel approvals screen will be displayed
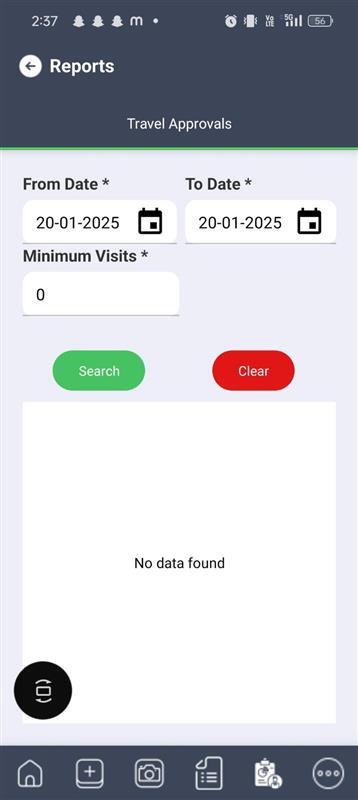
- Select From Date and To Date
- Enter Minimum Visits
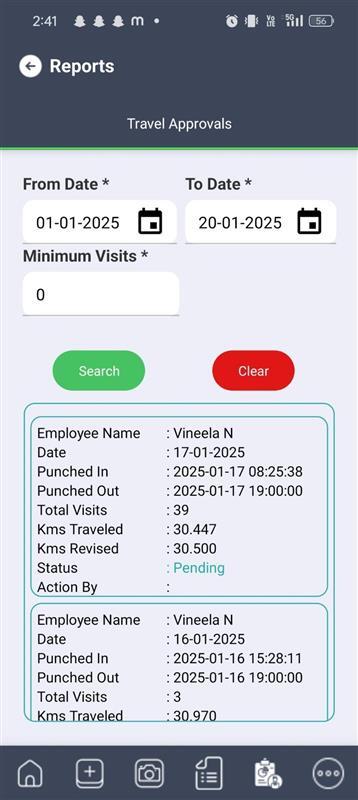
- Click on ‘Search’ button
- Travel details are displayed with status
4.7 More:
- Click on More tab Leave Management will display.

- In Leave Management employee have two screens Leave Request and Leave history

4.7.a Leave Request:
- Sales Executive able to apply leave and able to see available leave balance.

- Select leave type
- Select From date & To date
- Select second half & First half. (Based on leave requirement)
- Leave count is displayed automatically
- Enter reason for leave
- Click on submit button to submit leave request
4.7.b Leave History:
- Employee can see the applied leaves and approved leaves in leave history page

- On click on PDF and Excel icons, Manager able to download reports
5.3 Punch In/Punch Out:
5. Manager Level Features:
Manager Login:
- Managers have the features to Punch In/Out, Add Client, Add Activity, Employee Location, Attendance Reports, Leave Request and Leave History.
5.1 Login:
- Enter Company code, Username/Email and Password and click on Login.

5.2 Dashboard:
- After successful login, main dashboard is displayed.
- Allow all security popups to continue.

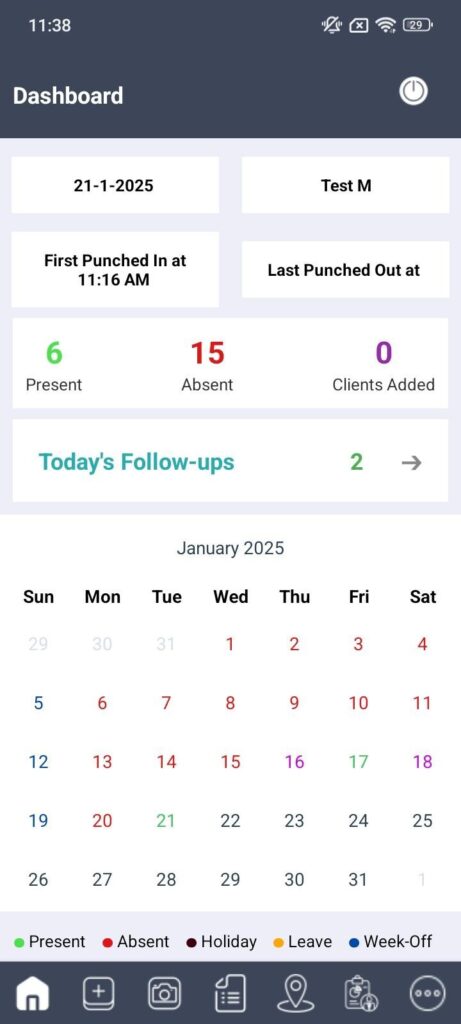
- Dashboard consist of Prent Date, Punch In and Punch out time, No. Of Presents, No. Of Absents, No. Of Clients Added, Calendar with Presents, Absents, Holidays, Leaves, Week offs, and Graph.
- Manager consist of seven tabs Dashboard, Add client, Punch In/Out, Activity Dashboard, Employee Location, Attendance Reports and More.
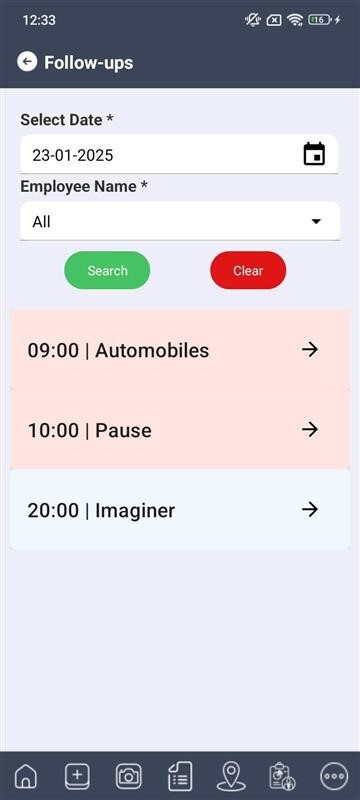
- Select ‘Select Date’ and ‘Employee Name’
- Click on Search button to get today’s follow-ups
- Employees consist of four tabs Dashboard, Add client, Punch In/Out, Activity Dashboard and More
- Manager consist of seven tabs Dashboard, Add client, Punch In/Out, Activity Dashboard, Employee Location, Attendance Reports and More
5.2.1 Activities:
- If client want to add activity with only image, Activates option is display in Dashboard in place of Today’s Follow-ups

- On click Activities arrow “Activities” screen will display

- On click “Add Activity” button, Add Activity screen will be displayed

- On click Camera icon, camera will open and on click Take Picture button image will be taken
- Enter Description
- Click on Save button to add activity
- Added activity is display in Activities screen

5.3 Punch In/Punch Out:
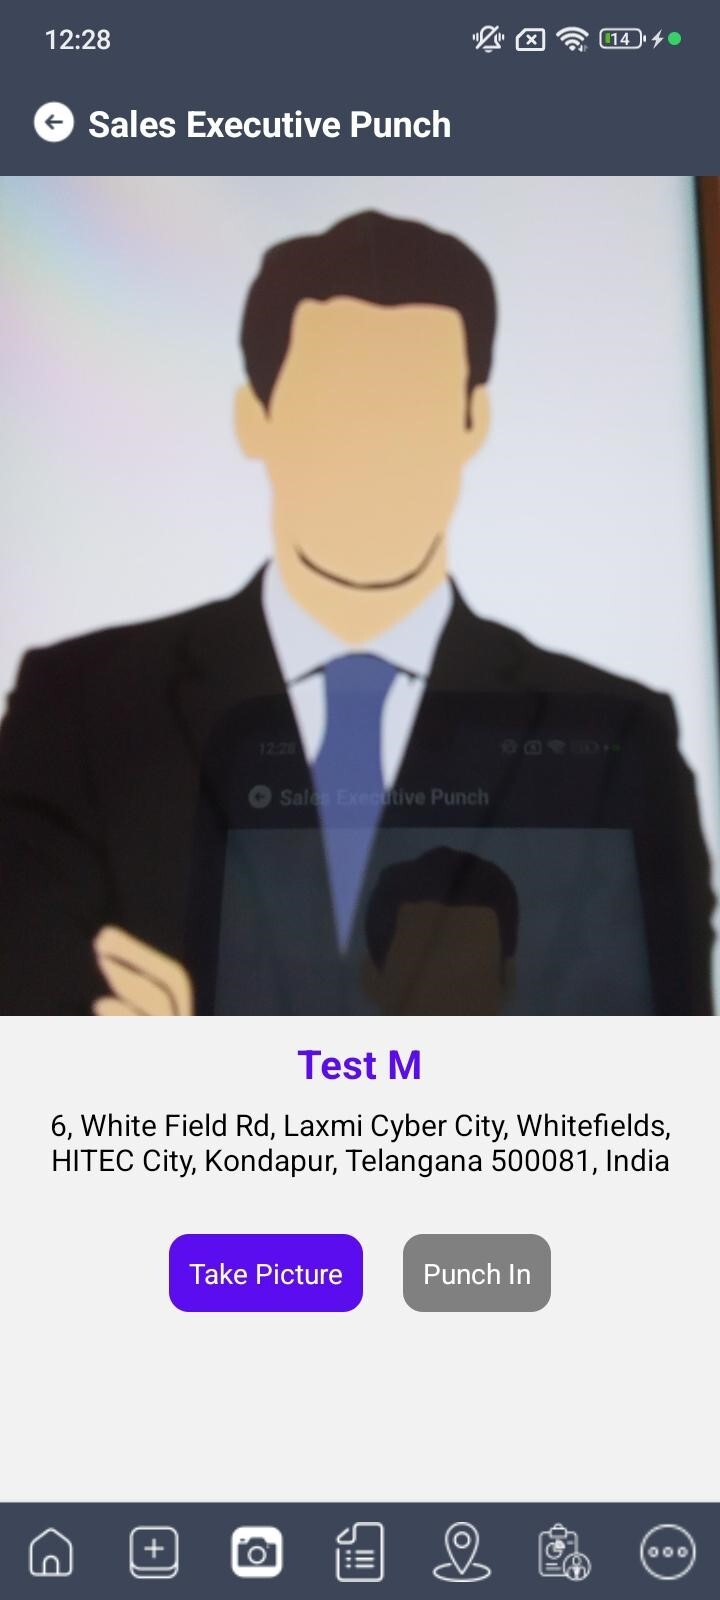
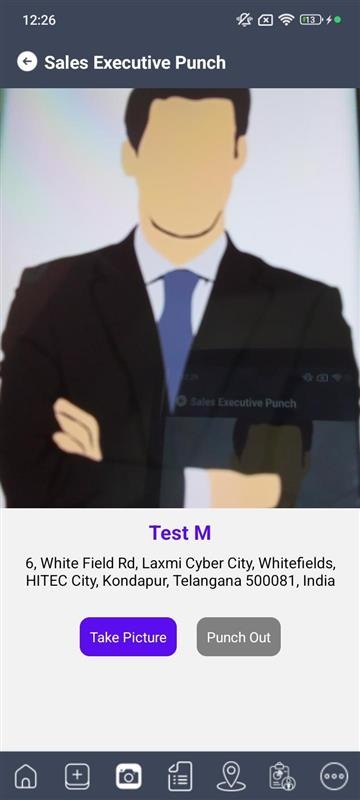
- On click camera tab Punch In screen is display with camera and manager details name and address.
- Click on the Take Picture button Punch In/Out button will enable and manager able to punch in/out.
- Punch In/out image is captured.
5.4 Add Client:
- Manager able to add client

- Click on camera to take picture
- Enter Organization, Contact Person, Contact Number, Email, Address1, Address2.
- Select Country, State, City, Pin code.
- Enter Expected Price and Description.
- Click on Save button to save Client details.
- Added client navigate to Activity dashboard screen LEADS column

5.5 Activity Dashboard:
- Added Clients will be segregated based on the Activity status of the Client. (Leads, Call for Demo, Demo Pending, Demo Completed and Future Leads).
- If the Client was added by the Employee for the very first time, then the Client will be displayed under the Leads.
- Click on the right arrow, add activity screen is display.
5.5.a Add Activity:
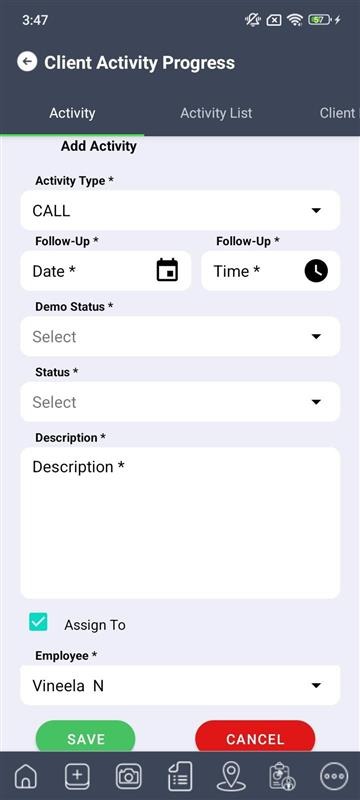
- Select Activity Type, Follow Up time, Follow Up Date, Demo Status, and Status.
- Enter Final Price and Description.
- Click on ‘Save’ button to save activity details.
- Add Client must move to “Call for Demo, Demo Pending, Demo Completed and Future Leads” from the Leads depending on the Demo Status.
5.5.b Activity List:
- Added Activity details are display in Activity List.

5.5.c Client Details:
- Employee able to edit client details

- Click on ‘Edit Details’, fields will be enabled and employees able to edit details.
- Click on ‘Update’ button updated details are saved.
- Click on ‘Cancel’ button edited details are not saved.

5.5.d Client Associates:
- Employee able to add client associates

- Click on ‘ADD’ button, fields will be displayed and employees able to add details
- Click on ‘Save’ button details are saved
- Click on ‘Clear’ button entered details are clear from the fields and added clients screen will display

5.5.e Client Payments:
- Client Payments tab will display only after given final price in Add Activity
- Employee able to add client payments
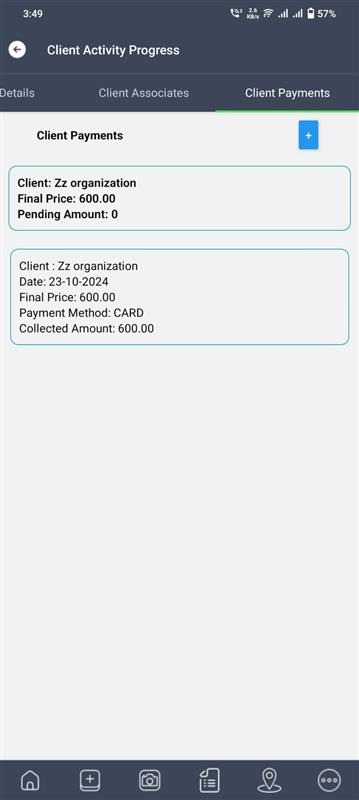
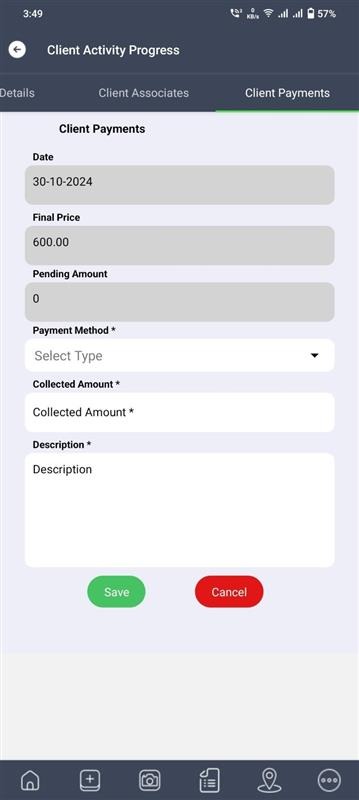
- Click on ‘ADD’ button, fields will be displayed and employees able to add details
- Click on ‘Save’ button details are saved
- Click on ‘Clear’ button entered details are clear from the fields and added clients screen will display
5.6 Employee Location:
- All assigned employees including manager names are displayed

- On click location icon employee present location is displayed.

5.7 Travel Approvals:
5.7.a Travel Approvals:
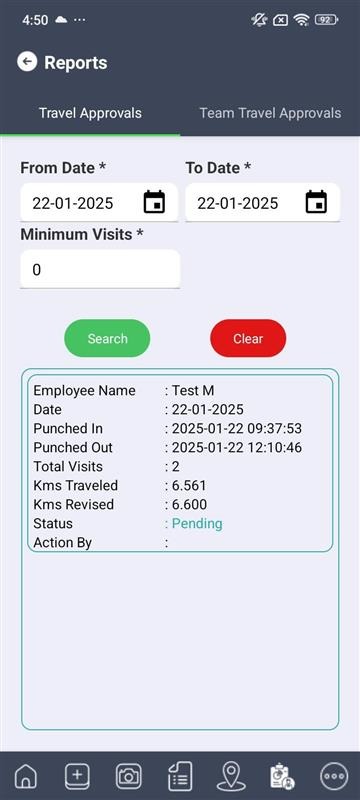
- Click on Reports tab, Travel approvals screen will be displayed
- Select From Date and To Date
- Enter Minimum Visits
- Click on ‘Search’ button
- Travel details are displayed with status
5.7.b Team Travel Approvals:
- Click on Team Travel Approvals tab, screen will display
- Select From Date To Date and Employee Name
- Enter Minimum Visits
- Click on ‘Search’ button
- Team Travel details will display with status
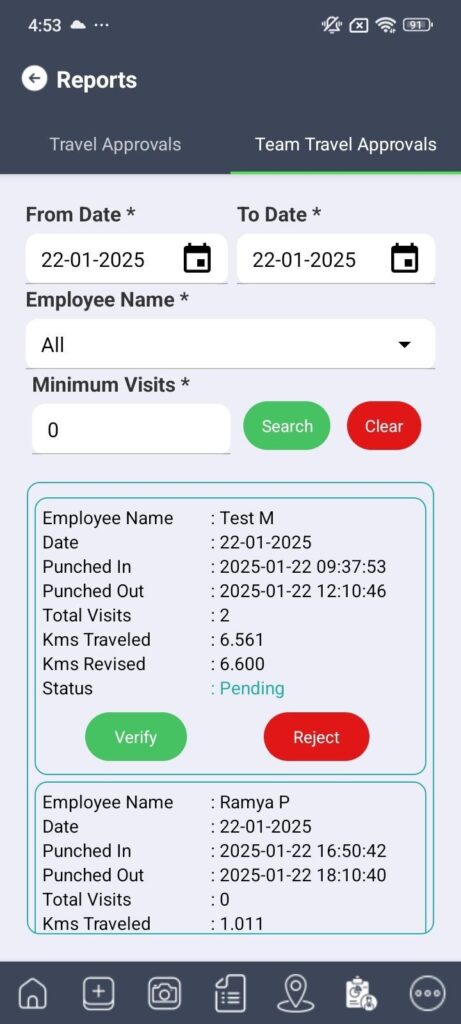
- Click on the Verify button, record is verified
- Click on the Reject button, record is rejected
5.8 More:
- Click on More tab Leave Management will display.

- In Leave Management manager have three screens Leave Request, Leave history and Pending Approvals.

5.8.a Leave Request:
- Manager able to apply leave and able to see available leave balance.

- Select leave type
- Select From date & To date
- Select second half & First half. (Based on leave requirement)
- Leave count is displayed automatically
- Enter reason for leave
- Click on submit button to submit leave request
5.8.b Leave History:
- Manager can see all employees applied leaves, approved leaves, rejected leaves and cancel leaves in leave history page

5.8.c Pending Approvals:
- Manager can see all employees pending requests.

- Click View button leave details displayed with Approve and Reject buttons.

- Click on Approve button leave will be approved.
- Click on Reject button leave will be rejected.

