User should login with finance admin credentials and click on Payroll module
Finance Dashboard:
User can select Past months & Departments to check the employee's total salary, EPF, ESI & PF details.
EPF:
Click on EPF in the side menu
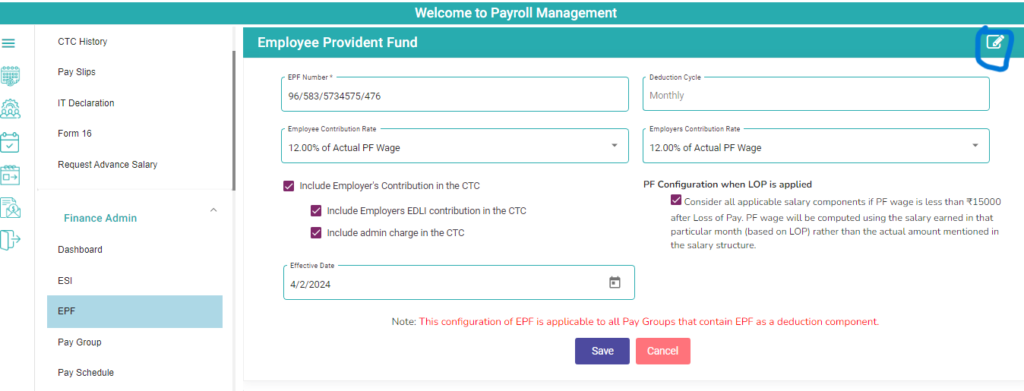
EPF configuration page is displayed with by default configuration
Click on Edit button to update the EPF Configuration
Admin can change all the configuration rules, based on organization rules. (Employee contribution and Employer's contribution & Admin charges, EDIL contribution)
Click on save button to save the latest updates
ESI:
Click on ESI in the side menu
ESI configuration page is displayed by default configurations
Here, User can check or uncheck the option” Include Employer’s contribution in the CTC”. Based on this selection, Employee's will get the ESI amount
User can Add & Edit ESI Number State wise ESI number in this screen
Pay Schedule:
Click on Pay Schedule page
Pay schedule configuration page is displayed. Earlier configuration displayed by default
Click on edit button to change the configuration
All the configuration rules will display, now user can change the pay schedule rules as per organization rules
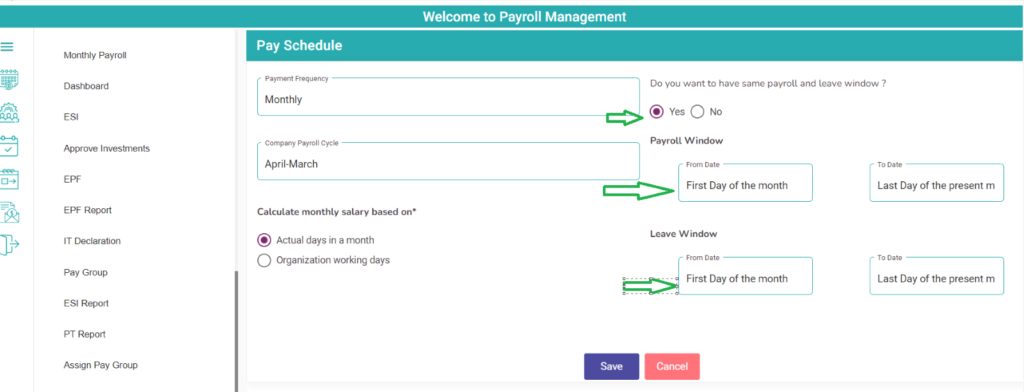
If user wants Same payroll and leave window. Users should select the YES option
If user selects YES option, Both Payroll window and Leave window are same
Example: Organization wants to pay the salary to employee's 1st to last day of the month
Based on this selection, the application will calculate the salary
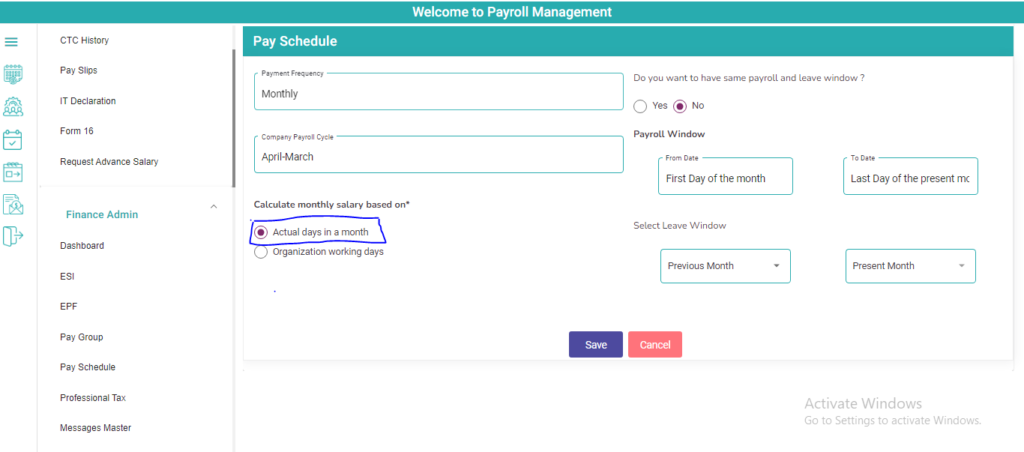
If user wants different payroll and leave window. Admin should select No option
If admin selects No option, Both Pay roll window and Leave window are different
Admin can select the leave window dates
Example: Organization wants to pay the salary to employees 25th to next month 24th
User should select the date Previous month 25 and present month 24
Based on this selection, the application calculates the salary
If an organization wants to calculate monthly salary based on Actual days in a month
User should select Actual days in a month option
If an organization wants to calculate monthly salary based on Organization working days
User should select Organization working days option
Click on Save to save the configurations
Based on these configurations, Employees salary will generate
Pay group:
In every organization, every employee has some range of salary with earnings and deductions
So, User can configure that range of salary, Earnings & deductions
Click on the pay group page to configure the pay group
Click on the add button to add a new pay group
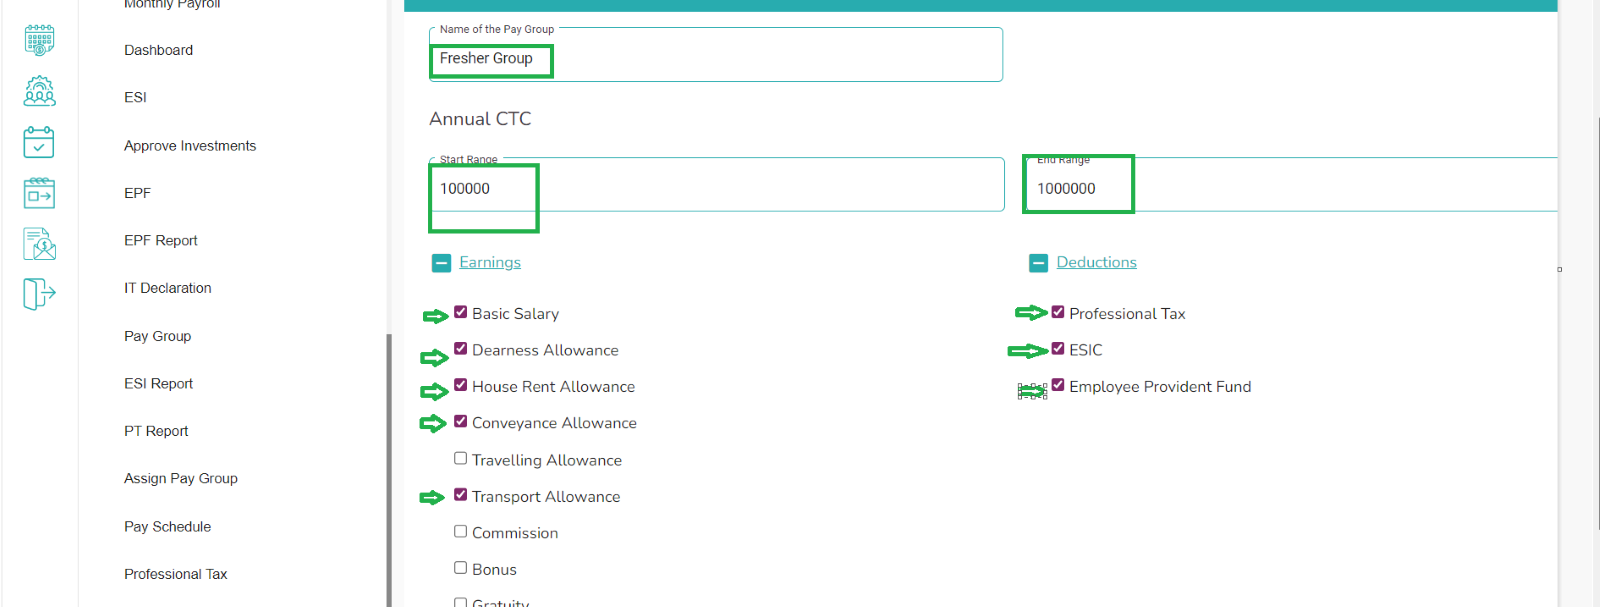
Add pay group page will display. Users can enter Pay group name, Start range & End range
Select Earings and Deductions based on Organization rules
Click on the save button to save the new pay group
The new pay group will be displayed in the pay group table with configuration in progress status
Pay group configuration:
Click on Configuration Button to configure the pay group
All the selected Earnings and deduction components will be displayed
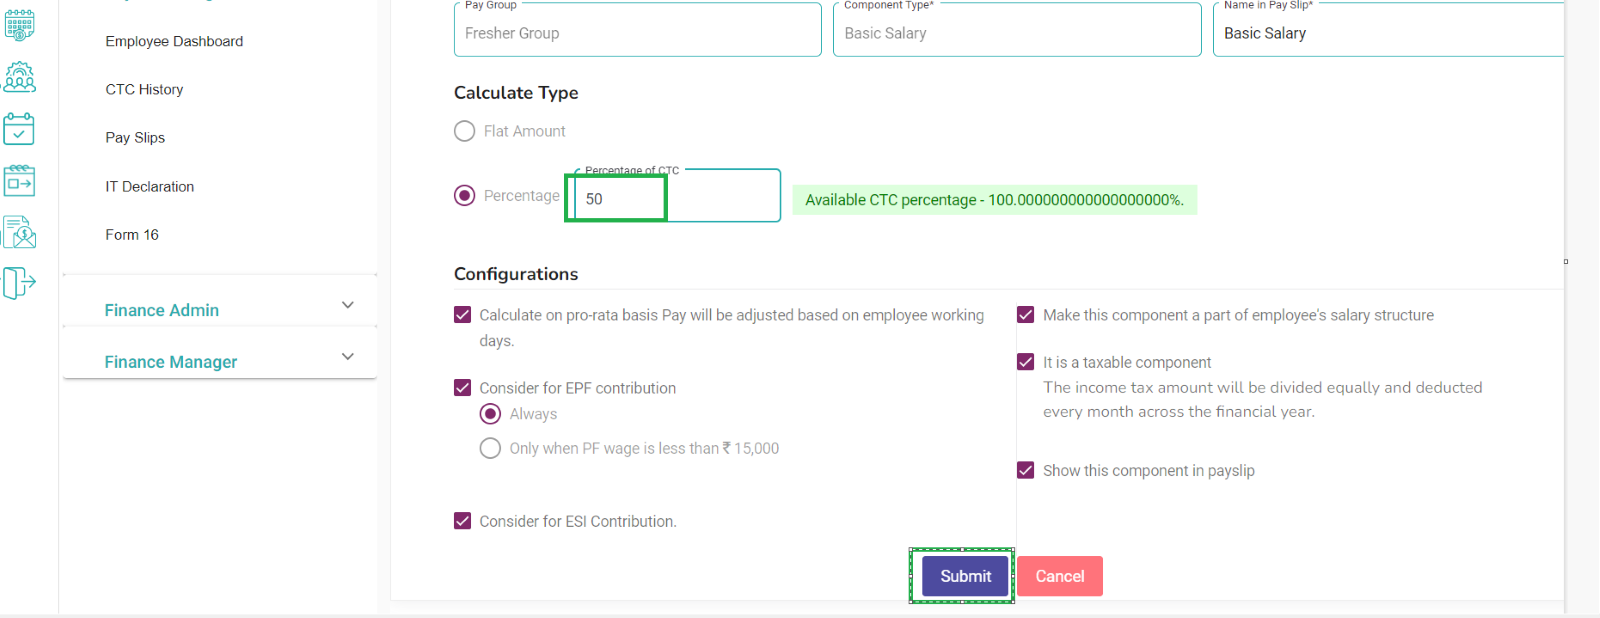
Click on configure button to give percentage or flat amount to that component
The Earning request page will display, here user can enter percentage or flat amount to the selected component
Note: Here users can check CTC percentage and Basic salary percentage. These percentages/flat amount will change automatically based on user inputs
Click on the submit button to save the changes.
Note: Few components are not allowed to flat amount, so user should give percentage only to that type of components. Flat amount option will be in disabled mode.
Note: Few components are not eligible to calculate EPF. EPF option will be in disabled mode.
Note: User can change the component name as they wish. It will reflect in Pay slip.
Then, pay group status is changed to “ACTIVE” from “Configuration in Progress”
Note: Note: Active pay groups only display in assign group section. Otherwise, that pay group not displayed when user assigning to employee.
Bank Master:
In bank master screen, click on add button fields will display
Finance admin can give all the bank details (Bank Name, IFSC Code, Account Number, Address1 and Address2)
Finance admin can select (Country, State, City, Status, Is EPF, Is ESI and Is Professional Tax)
Click on submit button to submit the bank details
Click on Edit button, edit the bank details
On click Update button, data will be saved in table
Submitted data will display in table
Payroll Policies:
How to configure Payroll policies?
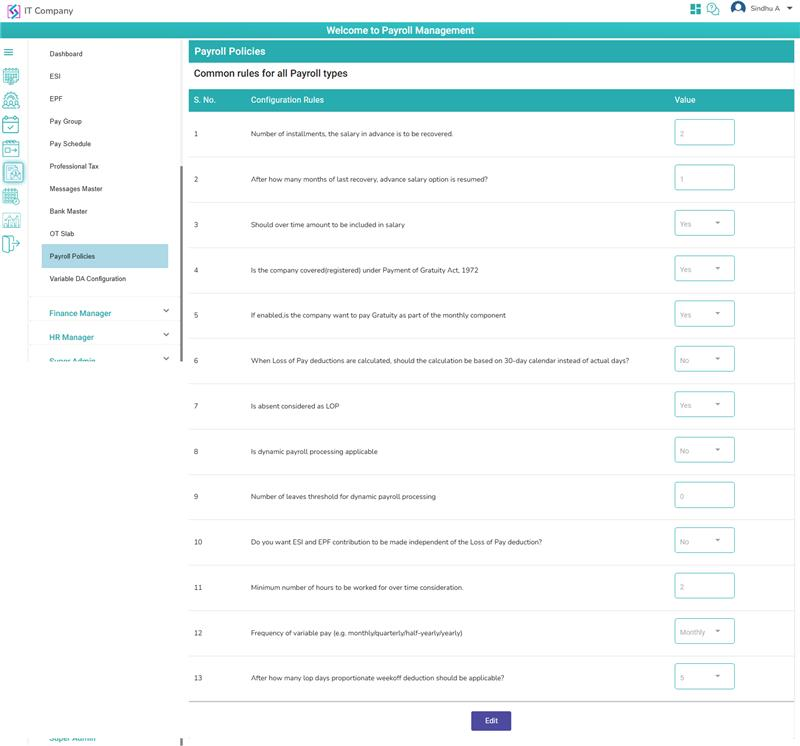
Click on the payroll Policies in the Finance admin screen
Configuration rules for all Payroll Types are displayed
Rule1: Number of installments, the salary in advance is to be recovered. — User can enter minimum no of months that employee can recover
Rule2: After how many months of last recovery, advance salary option is resumed? — User can enter minimum no of months that employee can recover
Rule3: Should over time amount to be included in salary – –User can select Yes or No from the drop downs
Rule4: Is the company covered(registered) under Payment of Gratuity Act, 1972 — User can select Yes or No from the drop downs
Rule5: If enabled,is the company want to pay Gratuity as part of the monthly component — User can select Yes or No from the drop downs
Rule6: Is variable DA applicable for this company– User can select Yes or No from the drop downs
Rule7: Is absent considered as LOP — User can select Yes or No from the drop downs
Rule8: Is dynamic payroll processing applicable- User can select Yes or No from the drop downs
Rule9: Number of leaves threshold for dynamic payroll processing- User can enter minimum No.of leaves should be accept for same leave window
Rule10: Do you want ESI and EPF contribution to be made independent of the Loss of Pay deduction? — User can select Yes or No from the drop downs
Rule11: Minimum number of hours to be worked for over time consideration– User can enter minimum No.of worked hours.
Rule12: Frequency of variable pay (e.g. monthly/quarterly/half-yearly/yearly)— User can select Monthly, Quarterly, Half-yearly and yearly.
Rule13: After how many lop days proportionate week off deduction should be applicable?–User can enter lop proportionate days
Rule 14: Is payment given for extra working days?- User can select Yes or No from the drop downs
Note: If an employee works on a weekly off or a holiday, the payment for those days will be considered as extra and reflected in the pay slip.
Variable DA:
Variable DA (Dearness Allowance) is a part of your salary that helps you cope with rising prices (inflation).
Here’s a breakdown: DA stands for Dearness Allowance, which is money given to employees to adjust for the cost of living. Variable DA means this allowance changes (varies) based on inflation or the Consumer Price Index (CPI).
So, if inflation goes up, Variable DA increases to help you maintain your standard of living. If inflation goes down, it might decrease. It's mainly used in government jobs or in companies that follow government pay structures, and it's reviewed periodically (like every 6 months).
Variable DA Configuration:
Click on variable DA configuration screen in finance admin screen
Click on add icon
Enter Notification name
Enter Published Name
Enter CPI points
Enter CPI points at notified date
Enter Date
Enter VDA rate per point
Enter Effective date
Select attachments (if any)
Click on save
Click on view icon
User can be able to edit the fields if required
Click on update, changes will be saved
Click on cancel, changes will not be saved and navigated to table
Arrear Distribution:
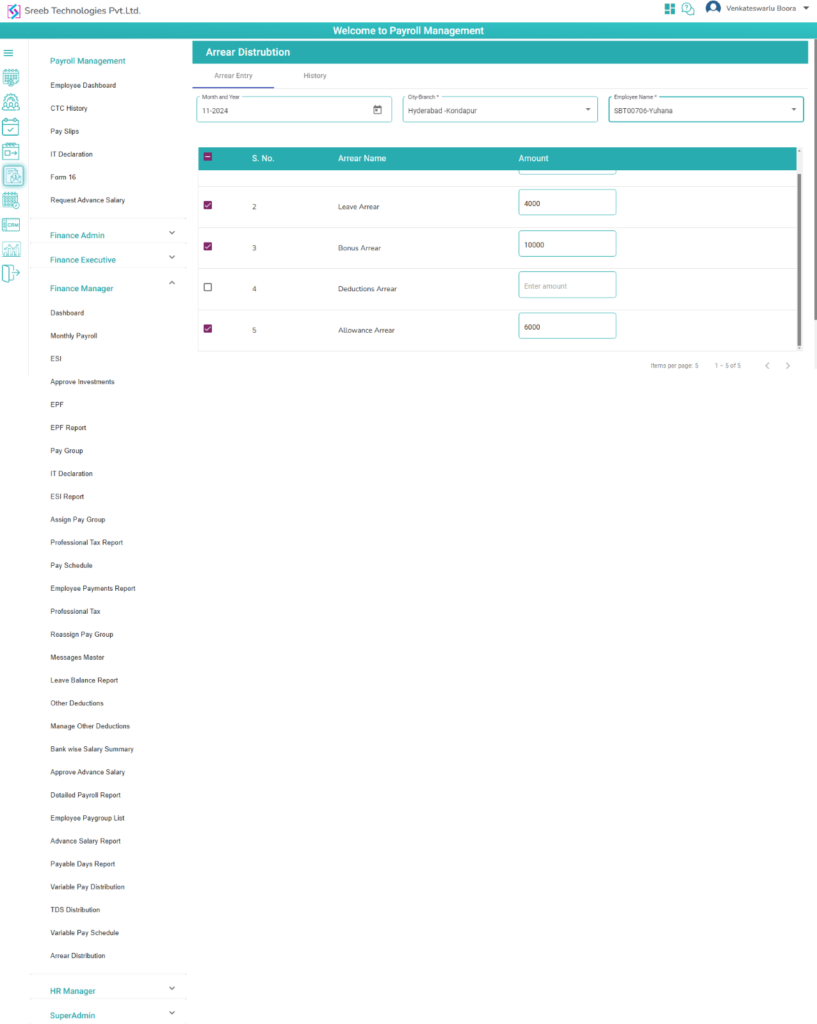
On click Arrear Distribution in side menu
Arrear Distribution screen will display
On click ‘Arrear Entry’ fields will display
User will be able to select ‘Month & Year, City-Branch and Employee Name’
Arrear Names will be display in table
User will be able to select arrear name and amount
User will be select at least one arrear name and amount
Select check box
Click on Submit button
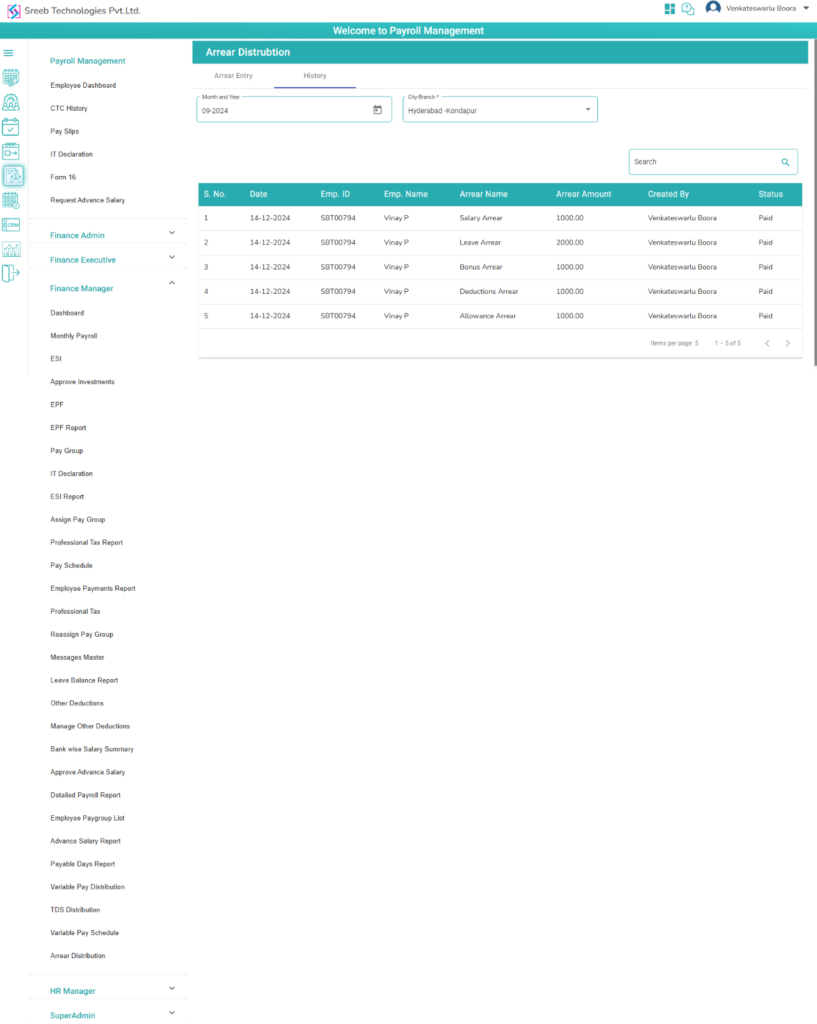
Arrear Distribution History:
On click History, History Screen will display
Select ‘Month & Year and City-Branch’
User will be able to search with ‘EMP.Name and EMP.ID’
Saved data will be displayed in the history table
Status will display as ‘Pending and Paid’
Note: “Once the payment is completed and the status is changed to ‘Paid,’ the arrear amount will also be displayed in the employee’s payslip view screen.”