- Admin Portal
- Employee Management
Employee Management
Company Information:
- All information about the company, the company name, location, and other company details can be defined here.
- You can enter the basic details of the company here. To start entering information click “Edit”

- After entering (or) updating the information in fields, to save entering information click “Save”.
- If the User doesn’t want to save the edited data, then click on Cancel.

Department:
- User creates Departments, and change status Active and Inactive for the created Departments
- Duplicate Department Names are not allowed
- Added departments are displayed in table

- Click on Add Icon

- User can add new Department in field
- Click on the Submit button, a new department is added to the table

- User can update the Department name by clicking on
, after updating click on “save” icon
Updated text is saved

Designation:
- User creates Designation, and make status Active and Inactive for the created Designations
- Duplicate Designation Names are not allowed

- Click on Add
button

- User adds new Designation in field
- Click on Submit button, new designation is added to the table

- User updates the Designation name by clicking on
, after updating click on save
, updated data is saved .

Work Location:
- Users adds Work Locations and make status Active and Inactive for the added work locations.
Please follow these instructions while adding a location.
- Provide SAME prefix and seed values if you need common employee-id generation across all branches.
- Provide DIFFERENT prefixes and seed values if you need separate employee-id generation for each branch.
- Prefix is a character string which is same for all the employees of a location. Ex: ‘GOGL’
- Seed value is the value that you want the employee-id generation to start from.
- Branch Location – short name, for ex. Kukatpally – like KP

- Click on Add
button

- User can select current location (or) search Location
- Click Location icon

- Click on Location icon

- Enter Work location details in fields (Address1, Address2, Branch Location, Country, State, City, Pin code, Prefix and seed)
- Click on Submit button

- Once a location is added it is displayed in table
- User can add multiple work locations

- User can Click on edit
to edit work Location details (Note: As the entered prefix already exists, seed value need not be entered.)
- Click on the view
icon to see the work location details but they are displayed in disabled mode.
Company Logo:
-
- User can add and update company logo here
-
- Accepts jpg, png images
-
- File size should not exceed 1MB
- Uploaded company logo appears before the company name in header

- Click on Change icon (for Updating Company logo)
- File Explorer will open, Select the desired image and click on “Open” button
- After Clicking the Open button image will appear in the company logo
- Click the “Save” button and the image will be updated with company logo
- Click on the cancel button, the selected image will not upload

- If the user wants to remove the saved image, then click on “Remove” button
Shift:
- Shift is used to assign shift to an Employee in company
- User can create different shifts with different time schedules
- User can also inactive the shifts that are not needed
- Enter Shift Name (Ex: – Regular Shift, Night Shift…) and Shift Description.

Shift Timings:
- Select Start Time and End Time (Time picker will appears when user click on Start Time and End Time) that are associated with that shift
- Total Hours will Auto Populate after entering Start Time and End Time
Grace Period:
- Select In Time and Out Time (Time picker will appears when user click on In Time and Out Time)
- Enter data in Number of lates is more than and Deduct leave count in fields.
Overtime duration:
- User can add Allow minimum number of work hours per day as per company rules
- After submitting the shift details, it will be listed in shift table
- Click on view icon to see the Shift details but they are displayed in disabled mode.

Holidays:
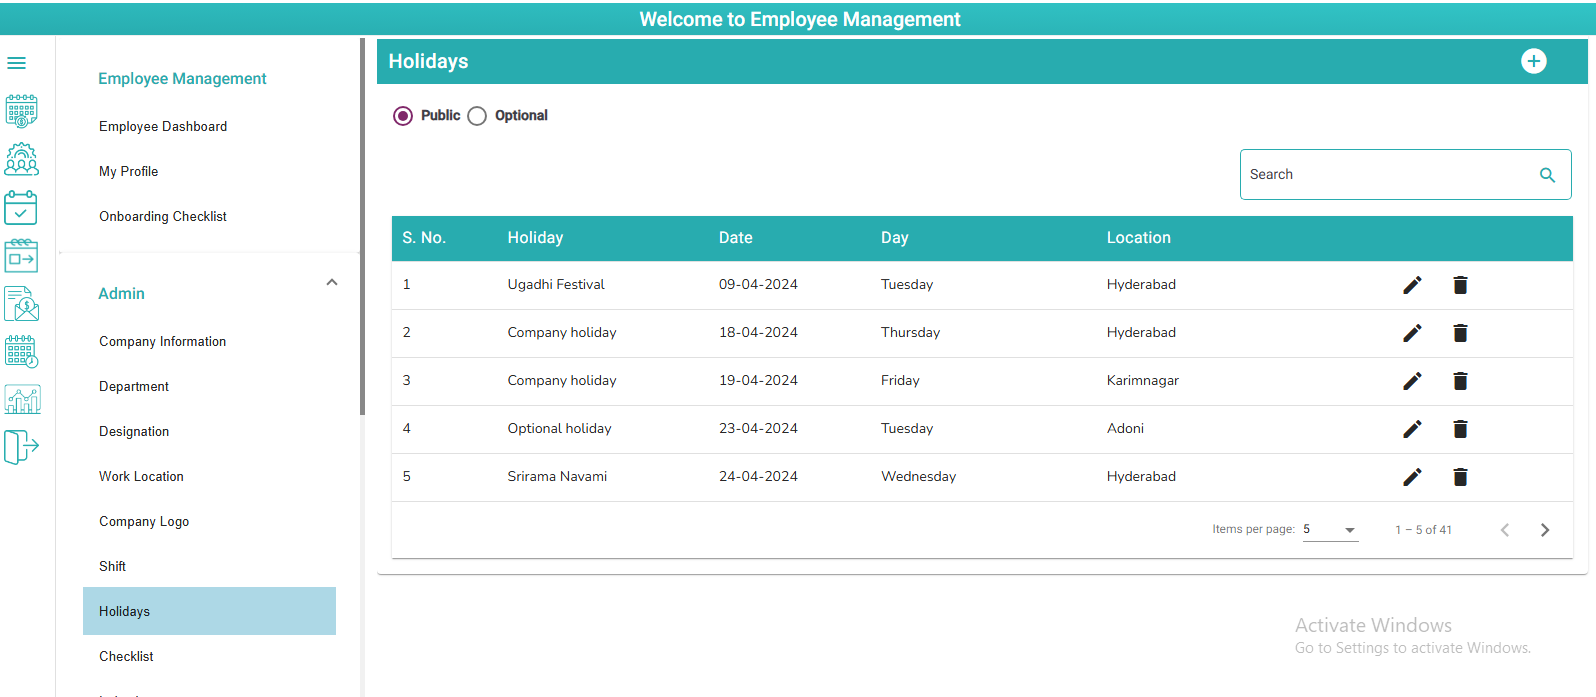
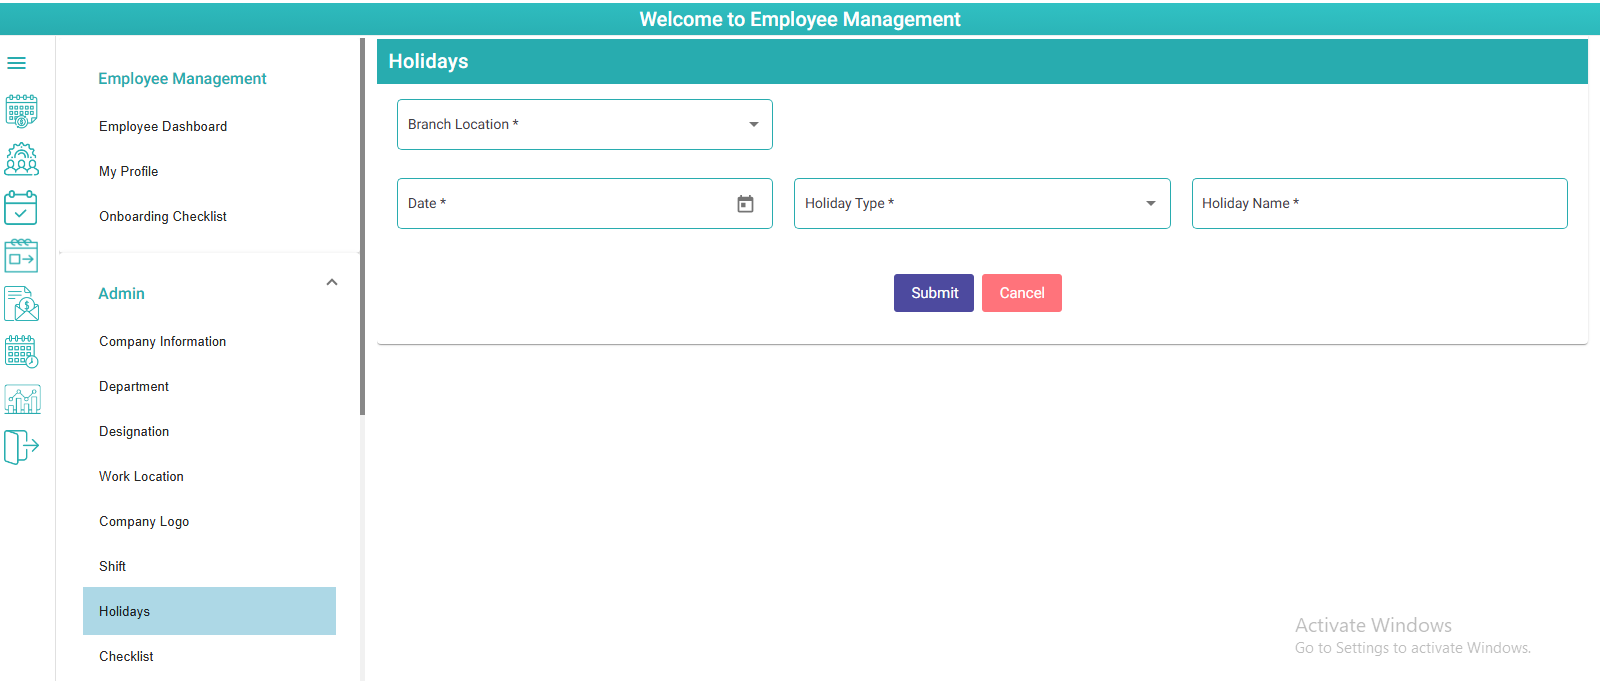
- Click “Add”
you will see fields (Branch Location, Date, Holiday Type dropdown and Holiday Name) for creating new Holiday
- After adding all details, click “Submit”, that holiday is displayed in Holidays table
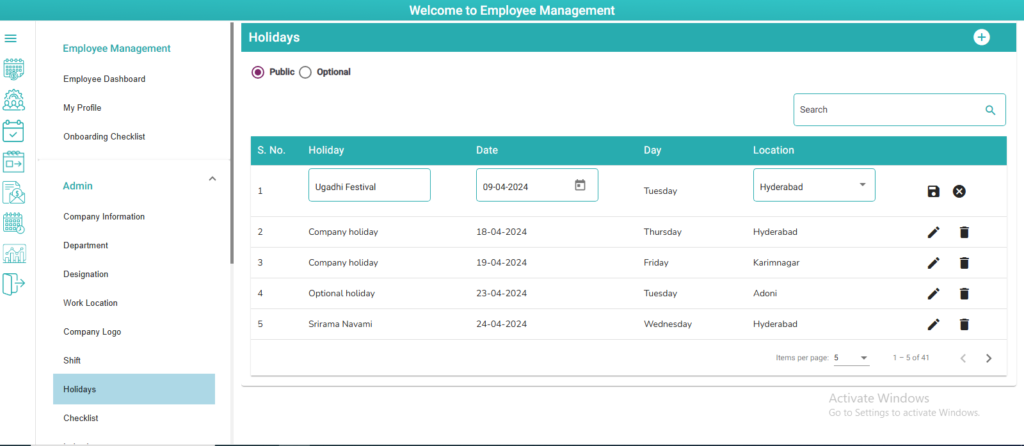
- User can edit Holiday by clicking on Edit icon
- Deleting holiday by clicking on delete icon
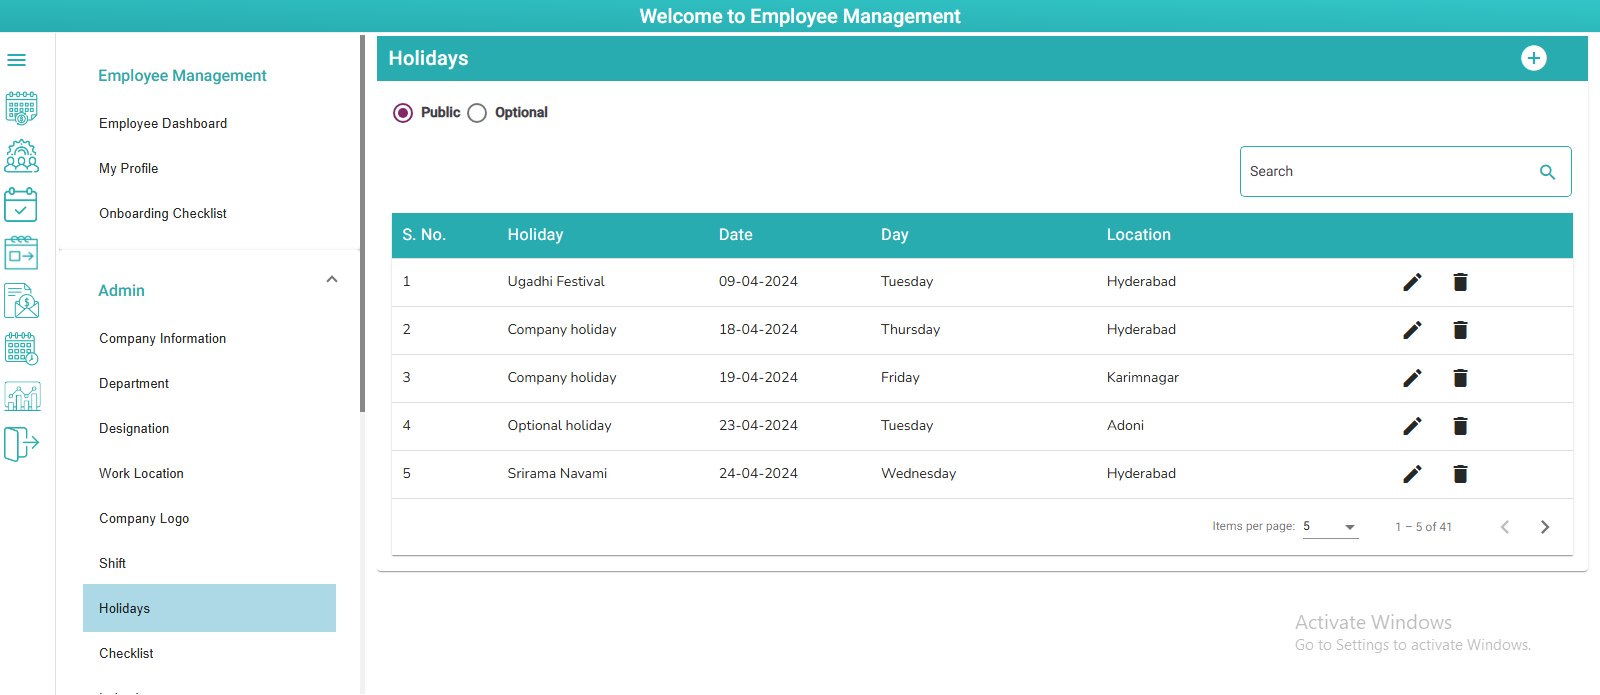
- Click on Public radio button
- Public holidays list will be display in table
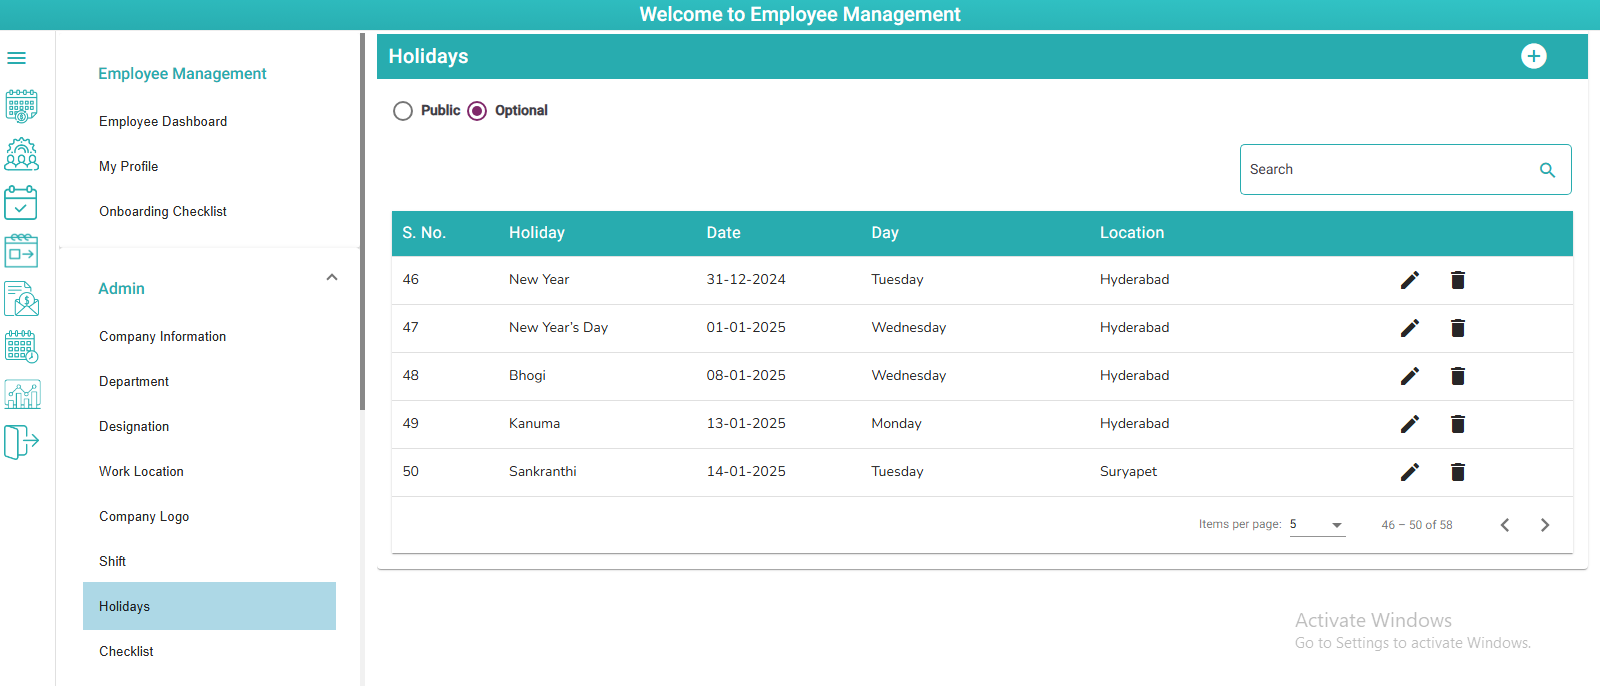
- Click on Optional radio button
- Optional holidays list will be display in table
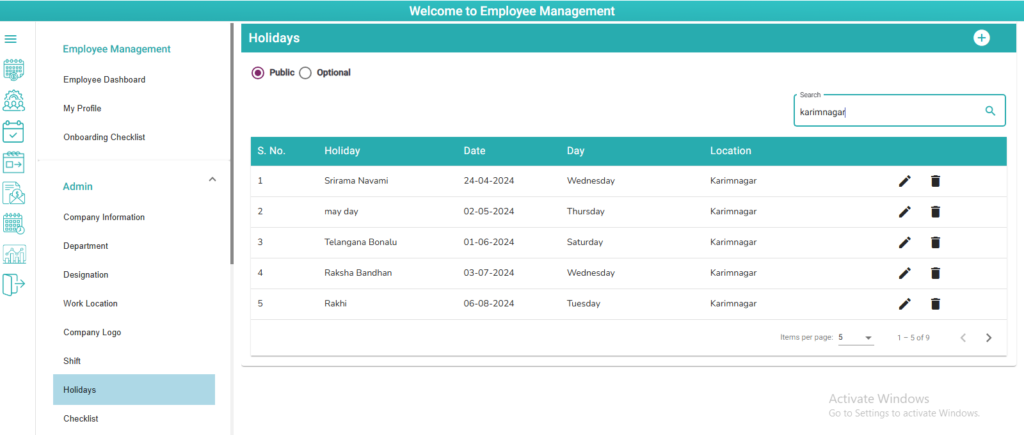
- User can search with branch wise holidays
- Edited data will be saved, when click on save Icon
- Click on Cancel icon, edited data will not be saved
Checklist:
- User Can add checklist by clicking on “Add” icon

- Select Onboarding or Offboarding by clicking on radio button
- Select Department and enter Checklist name in fields

- After adding all details Click “add icon”, that checklist will display in Holidays table
- User can change status as Active or Inactive for the created Checklist
- For updating checklist click on Edit
icon

- On click save Icon to save updated data
- Click on cancel icon data is not saved

Induction:
- Click on Add icon to create new Induction (HR Policies, Domain knowledge etc.,)
- Duplicate Inductions are not allowed

- After enter Program type in field click on Submit button, the program type is listed in table

- User can update Program Type by clicking on Edit icon, change status Active and Inactive by clicking on radio buttons under status column

- On click save Icon to save edited data
- Click on cancel icon data will not be saved

Announcements:
- User can add new Announcement by clicking on Add button

- Select Topic from Dropdown

- Enter Title name
- Select Publish from and Publish To dates from calendar (when click on the field calendar will displays)
- After entering description user can Click on submit or save as draft buttons (if click on submit status will be displayed as published, else click on save as draft status will be displayed as Save as Draft in table)
- Added Announcements are listed in table
- if status is Published edit, view and stop icons will be displayed
- If status is Save as draft, edit and view icons will be displayed
- If status is Completed, View and Republish icons will be displayed
- If status is Cancelled, only view icon will be displayed

Messages Master:
- User can Update those messages by clicking on Edit.

- Click on save to save the updated message.

Users Login:

- By clicking on Edit icon Employee name and Official Email ID is displayed in fields

- User can add Username in User ID field, password displays default to “Welcome1!” (Employee can update password in Employee’s login)
- After adding User ID, Click on Submit button to Create User Credentials.
Roles & Permissions:

- By clicking on Edit icon Employee name and Official Email ID is displayed in fields

- User can add Username in User ID field, password displays default to “Welcome1!” (Employee can update password in Employee’s login)
- After adding User ID, Click on Submit button to Create User Credentials.
Onboarding Settings:
- If enable, Reminder messages are sent to employees to complete Onboarding pending checklists

- If disable, No Reminder messages are sent to employees
- User can make Enable and Disable the Probation Period by clicking on the button
- If enable, Probation Period (In Months) drop down will be displayed and user will select Probation Period from the drop down

- If disable, Probation Period (In Months) drop down will be disappeared.

HR Policies:
How to configure HR policies?
- Admin can configure the HR Policies in Employee Management module
- Click on the HR Policies in the admin screens

- Configuration rules for all EMS Types are displayed
Rule 1: Minimum length of user’s password — User can enter minimum length of password as per organization rule.
Rule 2: Maximum length of user’s password — User can enter minimum length of password as per organization rule.
Rule 3: How many last passwords should not match with the current password — User can change password which is not same as last 3 changed passwords
Rule 4: Should the password start with a capital letter – User can select Yes or No from the drop downs
Rule 5: How many minimum capital letters should be there in the password — User can configure for the new password with minimum capital letters
Rule 6: Is special characters allowed in the password? — User can select Yes or No from the drop downs
Rule 7: Minimum count of special characters allowed in the password – User can enter minimum special characters in the password as configured
Rule 8: How many minimum small letters should be there in the password? – User can configure minimum small letters for the password
Rule 9: How many minimum numbers should be there in the password — User can configure minimum numbers in password.
Rule 10: Send Automatic Remainders for Onboarding — User can select Yes or No from the drop downs.
Rule 11: Probation Period — User can select Yes or No from the drop downs
Rule 12: Probation Period in Days – User can configure probation period days
Rule 13: Send Automatic Remainders for Offboarding — User can select Yes or No from the drop downs
Rule 14: Notice Period — User can select Yes or No from the drop downs
Rule 15: Notice Period in Days – User can configure notice period days
Rule 16: 1st default week off – User can configure 1st default week off
Rule 17: 2nd default week off – User can configure 2nd default week off
Rule 18: 3rd default week off — User can configure 3rd default week off
Rule 19: Do you want to assign shifts to unassigned employees automatically? — User can select Yes or No from the drop downs
Rule 20: Select a shift that will be assigned to a shift unassigned employee – User can configure notice period days
Rule 21: Select a duration for which the shift will be assigned. – User can configure the duration of week off for the shift to be assigned
Rule 22: How many maximum late attendances are allowed per month before deducting leave? – User can configure maximum late attendances allowed per month
Rule 23: How many leaves are to be deducted in case of exceeding maximum permitted late attendances per month? — User can configure number of leaves to be deducted in case of exceeding maximum permitted late attendance
Rule 24: Which leave type is to be used for deducting leave in case of exceeding late attendances per month? — User can select Leave type which are activated in the leave policies from the drop downs
Rule 25: Select a shift to which a new unassigned employee will be added to. – User can select shifts which are added in the master’s from the drop down
Rule 26: Select a duration for which a new employee will be assigned the default shift – User can select duration from the drop down for the employee to assign the default shift
Click on the save button to save the changes.
Note: If the user updates any HR Policies configuration, those changes do not affect existing employees. The newly made changes affect newly created/added employees.
Rule 27: How many minimum hours to work to treat it as half day attendance – User should work for 4 hours in a shift then considered as worked for half day
Rule 28: How many minimum hours to work to treat it as full day attendance – User should work for 8 hours in a shift then considered as worked for full day
Rule 29: Consider an employee permission as a paid permission or not – If employee took permission in productive hours that will not deduct in salary
Rule 30: Is flexible shift enabled for your company – User will take decision; user need to work for particular shift or flexible shift
Rule 31: How many hours duration is considered for Flexible shift – User will enter total hours employee need to work in a day
Rule 32: Is an option needed in regularization screen to mark specific regularization record as week off? – User can select Yes or No from the drop downs
Rule 33: How many past days data has to be displayed for regularization – User can enter past days.
Rule 34: Is employee details editable by employee- User can select Yes or No from the drop downs
Rule 35: Is default punch out time to be populated if out punch is missed- User can select Yes or No from the drop downs
If select Yes –missed punch report is display
Rule 36: Is mapping required between departments & designations?- User can select Yes or No from the drop downs
If select Yes-user can map Department with Designation Rule 37: How many backdated days allowed for termination (0 to 60 days) – User can enter past days
If you select the check box and the selected policy will be updated.
Note: If check box is not selected then click on update policy will not update and error message will display
Rule 38: How much is duration for lunch (in minutes) – User can enter lunch time
If you select the check box and the selected policy will be updated.
Note: If check box is not selected then click on update policy will not update and error message will display
Rule 39: How much is duration for Tea break (in minutes) – User can enter Tea break time
If you select the check box and the selected policy will be updated.
Note: If check box is not selected then click on update policy will not update and error message will display
Rule 40: How much grace period for late attendance (in minutes) – User can enter grace period for after shift in grace time
If you select the check box and the selected policy will be updated.
Note: If check box is not selected then click on update policy will not update and error message will display
Rule 41: How much is grace period for lunch (in minutes) – User can enter grace period for after lunch break shift in grace time
If you select the check box and the selected policy will be updated.
Note: If check box is not selected then click on update policy will not update and error message will display
Rule 42: How much is grace period for tea break (in minutes) – User can enter grace period for after Tea break shift in grace time
If you select the check box and the selected policy will be updated.
Note: If check box is not selected then click on update policy will not update and error message will display
Rule 43: Is payment for extra days worked, applicable in the company? – User can select Yes or NO option from the dropdown
Note: If user select Yes from the dropdown, you will get amount based on condition.
Note: If user select No from the dropdown, extra day amount not added
Rule 44: If applicable, which day 1 is considered for payment for extra days worked? – User can select week off day 1 from the value field
Note: If user select extra week off day as ‘Sunday’ based on condition amount will be added to pay slip and extra days will display in extra day report.
Note: If check box is not selected then click on update policy will be updated.
Rule 45: If applicable, which day 2 is considered for payment for extra days worked? – User can select week off day 2 from the value field
Note: If user select extra week off day as ‘Saturday’ based on condition amount will be added to pay slip (OR) User can select no week off.
Note: If check box is not selected then click on update policy will be updated.
Rule 46: Is salary deduction applicable for not working on weekoff day? – User can select Yes or NO option from the dropdown
Note: If user select Yes from the dropdown, penalty amount deducted based on condition.
Note: If user select No from the dropdown, penalty amount not deducted
Rule47: If applicable, which day 1 (if not worked) is considered for salary deduction as penalty? – User can select week off day 1 from the value field
Note: If user select penalty week off day as ‘Sunday’ based on condition amount will be deducted and display in penalty report and pay slip.
Note: If user select no week off, penalty deduction is not applicable.
Rule 48: If applicable, which day 2 (if not worked) is considered for salary deduction as penalty? – User can select week off day 2 from the value field
Note: If user select penalty week off day as ‘Saturday’ based on condition amount will be deducted and display in penalty report and pay slip.
Note: If user select no week off, penalty deduction is not applicable.
Note: If check box is not selected then click on update policy will not update and error message will display
Employee Password Reset:

- Select Location Name
- Select Department Name
- Select Employee Name
- Select Reset Option from the dropdown
- Select “Username”
- Enter new username
- Click on submit
- User will receive Reset username mail from HR Department

- Select Location Name
- Select Department Name
- Select Employee Name
- Select Reset Option from the dropdown
- Select “Password”
- Enter New Password
- Click on submit
- User will receive Reset password mail from HR Department

- Select Location Name
- Select Department Name
- Select Employee Name
- Select Reset Option from the dropdown
- Select “New Username and Password”
- Enter New username
- Display new password
- Click on submit
- User will receive Reset username & password mail from HR Department

Department Designation Mapping:

- Select Department
- Select Designation

- Click on submit button
- User can search department with designation

